Showing posts with label decoration. Show all posts

Wednesday, September 29, 2010

A Unique Idea???

I know, I know...technically I'm not a bride anymore. I'm a wife. But just like all good addictions, checking out wedding photographers isn't something that I've been able to completely tear myself away from yet. I unsubscribed to weddingbee LONG ago...but I still stalk a few photographers...one of them being my own fabulous photographer, Christina Carroll.
Imagine my surprise when I came across something sort of unique today on my stroll. Maybe you've seen something like this before, but I haven't. I don't know if the bride did this project DIY or if someone else did it, but I think that it really makes a statement.
It's a wreath hanging suspended over the dance floor (like a chandelier?) and hanging from it instead of lights are small tea light candles. They're hanging with plain twine, giving it a cozy-homey feel to it and making me think that this was made. Here's a picture of what I'm talking about, and since it's a collage picture you can see that the wreath totally fits in with the theme of the rest of the wedding decorations and there's a close up of the tea lights:

Here's another picture where you can see it in the background:Isn't that GORGEOUS?!?! You can find more of these awesome pictures here at Christina's blog - check out the rest of the wedding, I got sidetracked with the wreath/chandelier and couldn't focus on anything else...LOL!

Monday, May 3, 2010

It’s the Smallest Things...

…that make your wedding day perfect. I thought before I got to the reception pictures that I would share with you the up close and detail shots that our photographer, Christina Carroll, got of the décor around the reception hall.

These were all the projects that I sweat and slaved over...pouring all of my creativity and craftiness into making...and it was SO special to me that she got pictures of it all. To me, these are the things that made our wedding about US...they’re what made our wedding stand out and be special in our minds and in other’s minds.

Hope you enjoy!

Our programs – laying in their basket...the basket that I bought on sale, spray painted and made the liner for…
And a close-up on one of the programs all opened up...
Our Mason jar drinking glasses, which I painstakingly used as escort/seating cards...I printed them all out, stamped them, embossed them, mounted them and then tied them on...lots of work – but SO worth the effort!
And a special shot of my glass...this is the last time that you’ll see it empty!
Our favors...snickerdoodle cookies that I made from scratch...along with the labels explaining about our charitable donation...my Maids and Mom helped me stuff all of those cookies and seal all the bags. So much hard work, and SO yummy!
The main table that guests saw when they walked into the reception hall...all decorated with our signing book and kids activity books.
A close up of the activity books...
And some shots of the quilt-piece “signature book” layout...an update on how that quilt is coming soon, I promise!
And now for the table arrangements...our bridal table...
Our bridal party centerpieces...recognize those bouquets?
And our guest tables...
Like I said before...all of these elements added together make your wedding your own. Was it a pain in the butt to work on all of this stuff? Sure it was. But I enjoyed most of it. And to me, the end result was MORE than worth it! Our wedding was exactly as I had envisioned it...rustic elegance...and it was all of these small details that helped make it that way! And, Mom/MOH, you HAVE to admit that those EGGGPLANT tablecloths really MADE the room!!! LOL!!! It was worth all the time that it took to find them, huh? ;)

**All photos courtesy of Christina Carroll Photography

Need to catch up? Here’s some links:
Girls’ Spa Day
Bachelor/Bachelorette Party
Setting Up the Venue…
Practice Makes Perfect…
Rehearsal Dinner
5 Minutes is All that I Need
A “Quick” Stop at the Hair Salon
A Sneak Peek at the Venue...
Arriving at the Venue...to Stay!
Getting Dressed
The Maids Pose for the Camera...
Oops - I’m Out of Order!
The Boys Smile and Say “Cheese!”
It’s Show Time!
Here Comes the Bride!
Becoming Man and Wife...
We’re Man and Wife!
Family Pictures
Now THAT’S Love!
The “Group” Says Cheese!
Now It’s Just Us...

Saturday, August 29, 2009

An Easy Project...

I know, I know – this isn’t really the stuff that you want to see or hear about. This is a simple (and cheap!) project that I also knocked out this weekend while MOH was here helping me...but it’s NOT any of the big projects that I had posted about getting done. Sorry. Don’t hate me. I promise that I’m working on those, so this is just a little teaser in the meantime!

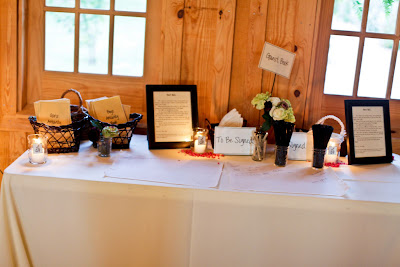
I found some plain, but cute, little vases at my local Wal-Mart a few weeks ago. At $1 a piece, I thought that they would be a great buy and the perfect thing that I would need to set at various spots around our reception. You know the cake table or the signing table or the escort card table might need a little floral love...these vases were the perfect size to add some floral accents without being a big centerpiece design or too overwhelming.

The problem with them? I thought that they needed a little something more...more panache, more jazz, just more. And since this was a simple DIY project, I started on it while MOH was busy working on my invites! (I’m SUCH a slave driver!) J

Here they are before.
To jazz them up a bit, I had seen a bee on weddingbee that added some ribbon to her centerpiece vases that added just enough of a touch of elegance to them that I was going to work off of. She had added a ribbon going all the way around the vase, and then crafted a bow to polish the look off. I found some ribbon that was a little sparkly organza in a black that was perfect for this the week before while shopping on Harry Hines Blvd in Dallas, TX.

First I measure off the length of ribbon that I would need. Then I cut 12 strips of ribbon.
I pulled out my handy hot glue gun and warmed it up. While it was warming up, I asked MOH for her opinion on bow or no bow...and she came up with an idea that was quite brilliant. Since she had been spending most of her weekend becoming “one” with the invitation suite, she immediately suggested that I use our monogram piece to jazz up the vase a little bit. I hadn’t even considered that as an option, so I set out trying it out.

But first I had to get the ribbon secured around the vase. I probably could have just used double-sided tape or something here, but I like the hot glue gun and it’s been feeling a little neglected since I finished all of my pomander projects. LOL.

One thing that I have seen is a bride making a template of sorts so that all the ribbons fall at the same height on the vases. Can you guess if I did that or not? Come on, take a guess...

If you guessed that I did, you would be...WRONG! Yep, you read that right folks. I can be anal-retentive with a touch of obsessive compulsiveness thrown in there for good measure about certain things be absolutely perfect (ahem, the invitations, cough) but this wasn’t one of them. Maybe I was fresh out of obsessiveness that day...but it also helps that these won’t be side by side. It would take a pretty discerning guest to compare these and see that they weren’t perfectly the same.

So a little dab of hot glue directly on the vase...in the general vicinity of where I thought it needed to go...Attach one end of the ribbon and press down so that the glue comes through the sheer material... And then wrap the ribbon around and press to the glue spot again to secure. After I let them dry for a minute, this is what I had. Following MOH’s suggestion, I taped a monogram to the ribbon to test the waters with it. I love that using the monogram would give me another opportunity to use it, as both B and I love it to death. And I think that the monogram gives the vase a very polished look, don’t you think?See for yourself. All in all, I’m happy with the final result. I’ve got to make some more of the monograms, and for the final product, I’ll use hot glue to attach the monogram as well...I don’t want to worry about tape coming unstuck. This was a cheap project that was finished in record time...a whopping 10 minutes. And all because I didn’t feel the need to measure them off! Just kidding.

Here’s a cost breakdown:
12 vases from Wal-Mart - $12.99
25 yard spool of organza ribbon - $3.24
Hot glue gun and sticks – leftovers from other projects
Monograms – leftovers from invitation suite
Total cost – $16.23

Making each vase a whopping $1.35!!! Yea for cheap and fast projects. In fact, these were so easy and simple that if I decide that I need some more vases to place around the reception venue, this would be a great choice. And I can easily fill them with leftover flowers from my centerpiece arrangements.

Did you have a project turn out so well for you? Not just how easy it was to complete, but also in terms of being budget-friendly? I’m curious to hear about it!

All images taken by me...and let me just mention now how HARD it is to do DIY projects with one hand while holding and focusing a camera with the other hand!

Thursday, June 25, 2009

One More Decision Down...

Mr. CC and I made a big decision the other day regarding our ceremony site. It’s something that I’ve been pondering about in the back of my mind for a few months now, but hadn’t really talked with Mr. CC about it at all. Imagine my surprise when he hears the options, that he just makes my decision SO easy! (That’s just one reason why I love him.)

Here’s the dilemma. I can’t exactly remember everything that the manager of Texas Old Town mentioned regarding our venue selection on the day that he met with us. I know, it’s shocking. But seriously. We looked at all three halls that TOT has to rent and they’re all a little bit different, all with different ceremony sits. So when I wonder about something, I usually check the TOT website and consult with their FAQ page, which is a GREAT idea for any venue to have!
Unfortunately, what I was wondering about didn’t get answered there. While on the site, I was perusing through some pictures and came across something that really made me wonder about my original question.

You see, I know that the reception site is all wood. Wood walls, wood floors, wood ceiling, wood trestles…and more importantly wooden chairs. What I can’t remember clearly is the ceremony site. Yes, I know that the arbor there is wooden. But are the chairs?
The picture that I clearly recall shows metal folding chairs. Plain, ugly, metal folding chairs. Probably NOT that big of a deal, but in the long run…not something that I really want to see when I look back at wedding pictures from our ceremony. I would much prefer wooden chairs. They look much prettier. I can’t remember if Danny (the manager) told me that the wooden ones were or weren’t available, or if they’re only available for certain halls…I just can’t remember. So when MOH and I were looking over their website to see something else, I came across a picture that shows what I think is my ceremony site with wooden chairs. Not pretty white or black ones, but a nice, natural wood. WAY better than metal folding chairs!
Since I can find nothing in my notes (probably because I didn’t write anything down that day!) and nothing on the website to answer my question of what type of chair our ceremony site come with, I quickly shoot off an email to Danny asking him about it. I needed to check with him on a few details anyway, so this was the perfect opportunity to do it all at the same time. His reply the next day confirmed my worst fear…the ceremony sites all come with metal chairs.

So…now I’m in a dilemma. My first thought is chair covers. Something like this perhaps?
But they’re somewhat pricey. You can find them from around $2 a piece, but that doesn't include the pretty sash. The sash can be an additional $2-4 each... depending on material and style and such. I wouldn't HAVE to have the sash, but most of them are kinda plain and need a sash...this is getting expensive.

My other option turns out to be more affordable. Renting chairs. It seems silly to rent chairs when the venue provides some free of charge, but hey – they’re ugly. And I don’t want ugly wedding pictures. Because by this point, I’m positive that the ugly metal chairs will be the focus of the wedding…irrational, I know. Bear with me.
I find chairs to rent in a nice folding white or black from anywhere between $2-$4 a piece. Which is a little cheaper than the cover route. I decide that this is something that I HAVE to have, and I figure out the best way to approach Mr. CC about it. I try to figure out a way to “pitch” the sale to him in a way that he’ll say yes. (The one pictured above is actually $3.50 at the most expensive place in Austin that offers rentals.)

It’s obvious that I read WAY too many wedding blogs, because Mr. CC is nothing like some grooms out there. He wants a nice wedding too, and more than that, he wants me to have the wedding that I want. I drop all pretense of a “pitch” and just tell him that I found out that the ceremony chairs will be metal folding chairs. I figure that straight up is the best policy here. Lucky for me, I’ve got a classy groom, and the look of horror that crossed his face when he pictured the metal chairs was priceless!

“But won’t that look a little…” Mr. CC commented, struggling to find the right words.

“Yes. It will.”

Then I tell him that I would like to rent them and how much it would be in total and he calmly tells me to go ahead and find them to rent. Yea me! See, brides, this is a lesson for you all out there – be forthcoming and upfront about the problems that you foresee with your upcoming wedding, and the groom deals A LOT better with the information.

Or maybe that’s just MY groom…I do tell myself how lucky I am over and over!

So there you have it. Now, take a look at this picture. You can’t tell me that these wooden chairs don’t look a LOT better than the previous ceremony site picture that I posted! Be honest…

Wednesday, June 24, 2009

A Home Run Idea?!?!

After all of the re-caps from last week’s shopping trip, I feel like I’ve just been a brainstorming machine over here lately! That’s not actually true, some things have been “stewing” on my “cooktop” but have needed to think about them a little more.

So now, after making some decisions regarding the bridal party attire – WooHoo to us! – I can move forward with some other things that I’ve been thinking of. One of the main topics of focus for me right now is those darn centerpieces. And now that I have these fabulous shoes decking out the entire girl-side of the wedding party, I have my hot pink thrown back into my color mix. Which makes bringing those Stargazer Lilies that Mr. CC loves so much back into the mix a LOT easier.

I know that I posted here about an idea to use a plant seated into the vase with little flowers inserted into the plant. This would bring the cost down on my floral budget, while also allowing me to DIY a lot of the project. But finding what I had pictured in my mind turned out to be harder than I thought. I think that was partly because I wasn’t totally sold on the idea.

Back to square one. Where should you start looking when you’re fresh out of ideas? Well, an obvious choice would be the internet. But I took the road less traveled and pulled out my bridal book. What’s that? Oh, my BRIDAL book, that large three-ring binder that I’ve been lugging around with me, storing snippets of information in each time I see something that I like. Yeah, that book. You mean to tell me that it can be used for things other than just storage? No way.

Apparently so. I took a break from a massive job-role mapping project that I was working on at work the other day, and pulled out my trusty bridal book and started perusing the pictures again. A lot of the pictures that I tore out will not work for my venue, but I kept them to use as inspiration. Because if I decided to go the route of using an actual florist, then I would need some inspiration pictures to provide to him/her so that he/she could get the overall “feel” that I was going for. I thought that it might do me some good to flip back through the pictures looking for fresh ideas and inspiration.

And since I’m posting about it, you’ve got to know that I found something. Actually, I found three somethings. I found three separate pictures that I’m going to try to combine into one finished centerpiece idea. I was going to pull in the pictures here, but as they were all three out of magazines that I collected god only knows when...you get that it was impossible to find them. Although I did look for them online, but no luck.

And here is my centerpiece (donated by the lovely Maid Britney!):
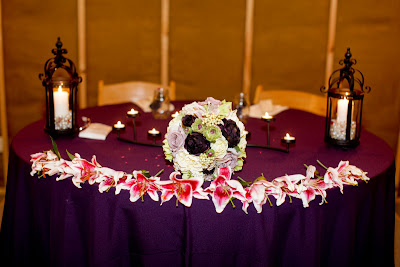
What I am envisioning happening here is this: the centerpiece is filled with water and maybe some green rocks/filler stuff on the bottom to pull in some color (maybe a light lime green, Mama CC?) with one single Stargazer lily floating on top. The candles are all lit and reflecting off the water beautifully. Around the bottom of the centerpiece, I’ve arranged a bed of moss and lovingly inserted a mixture of fresh and artificial flowers into the moss in shades of cream, lavender and light pink…all nestled on top of those GLORIOUS eggplant tablecloths.

To put it simply…I LOVE IT!

It’s perfect. Simple. Elegant. Goes with the theme and overall feel of our wedding. And would be simple enough for me to do on my own, which is important to this cost-conscious bride! And of course, I have the help of my talented Maids and Mama CC and FMIL CC that would also love to help out. Hint, hint ladies!

It incorporates all of my colors, and MOST importantly the ONE SINGLE thing that Mr. CC has requested of me – the Stargazer lily. I was worried about how the hot pink would look against the eggplant, but since it’s off of the table and floating in the vase, I think that it’s perfect. And seriously, after seeing the great shoes that we’re all sporting, how could I still be worried about the combination of eggplant and hot pink?!?!

Can you picture it all too? It’s a little hard, I know. But try.

It was hard for me to picture too, so i did a mock-up at home with some lilies that I bought at HEB. I mean, I didn't even know if lilies actually float!

From here, you can see the bottom of the vases needs something
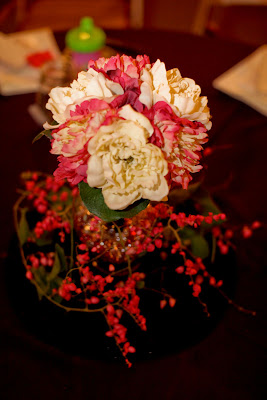
Here's a close-up on the flower...although the lily doesn't float, the petals hold it up...even when water gets in the center of the flower.

This is a view that you would walk up to it on a table and see...looking down...it's stunning!

What do you think?

It might be a little bit of work to make the ring around the bottom that I'm envisioning, but well worth it, I think. And can anyone tell me where I can buy moss? I would love to have real moss, along with real roses and of course real lilies. The rest of the flowers would be artificial, to get the colors that I want during the time period that I want them.

I found some artificial moss at http://www.save-on-crafts.com/ but I can’t help thinking that real moss would be THAT much prettier…any ideas on where I can get that? And on a budget?

Wednesday, June 3, 2009

Another Pomander Trial...

Mr. CC ended up having to work for a little while this past Saturday, which hasn’t happened in quite a while. It gave me the opportunity to have the house to myself for a while, so you know what that means, right?

Wedding TV show marathon!

Haha, just kidding. Well, I’m not really kidding, I did watch quite a few wedding TV shows Saturday morning. I mean, heck, no kids, no future spouse…what’s a bride to do if NOT watch wedding TV shows?!?! But I didn’t just sit around and watch TV, no ma’am. I had a to-do list with a few things that I’ve been meaning to work on and I was bound and determined to get them accomplished during this brief window of opportunity. I hear a few of you back there; you’re thinking what a great time to clean the house, right? WRONG! I can clean the house any old day of the week, and without my kiddos around, that just seems mean – they LOVE those swiffer dusters!

So I set to work. One of the items on my to-do list was to work on the pomanders. Several of you had made the suggestion to maybe use artificial flowers on the pomanders instead of the tissue paper. I made a few trips to Hobby Lobby over the course of last week and purchase quite a few options to work with.

I didn’t really like the miniature roses that Hobby Lobby had to offer. They were cheap and really fake looking, in my opinion. But I bought some anyway. I also bought regular sized roses, because I liked those better. My thought process was that I would be able to gently pull the heads of the flowers off of the stem and stick them into the Styrofoam ball without using any hot glue. Therefore, I would be able to easily return what didn’t work out…you following along with me?

Wouldn’t you know it…the ones that I didn’t like best were the ones that actually looked the coolest. The larger roses were WAY too big for the small Styrofoam balls that I had purchased and would be too oversized once completed – kind of like the tissue paper balls. But those fake-looking miniature roses were the coolest looking thing. Only problem that I ran into? I ended up having to use hot glue to get those little rosebuds to attach well. Some of them had enough of a stem once removed to actually stick into the Styrofoam ball, but a lot of them didn’t. Since I’d rather err on the side of caution, I pulled out my trusty mini hot glue gun and put just a dab of hot glue on the end of each stem before sticking it in…worked like a charm!

So here’s the results!

What do you think? I think that they look SO cool. Very textured looking and really neat. The one thing that I didn’t like? Now it seemed too small. These artificial flowers didn’t stand up quite like the tissue paper flowers and I think that the Styrofoam ball underneath needs to be a little bigger. I waited (impatiently) for Mr. CC to make it home from work so that I could show off my work and get his opinion on the matter. He agreed with me that the ball needed to be “just a bit” bigger, and off to Hobby Lobby I went.

I mean, the flowers were on a 50% off sale ending on Saturday…I HAD to buy them then! So I picked up more flowers, returned the ones that I wasn’t going to use and grabbed two different sizes of larger Styrofoam balls to see which one worked. Mr. CC and I were once again in total agreement, and Saturday night while we sat and watched a movie, I worked on pulling off all the little rosebuds on the 18 stems of miniature roses that I had purchased. That way on Sunday, when I was ready to work again, I could easily reach into a bag and pull out what I needed.

Here’s the second trial:

We LOVE this one.

A close up shot so that you can see the detail.

So picture 8 of these lining the walkway, 4 on each side, with a mixture of cream, lavender and eggplant rose petals lining the aisle. I can see it SO clearly in my head and it’s perfect! Of course, I will make a pretty bow on the actual ones when we tie them up for real.

What do you think? Do you like these pomanders better than the tissue paper ones? Do you like the smaller size or the larger one? (I'm sorry - I tried to take the pictures from the same zoom setting so that you could compare apples to apples...doesn't look like I accomplished that. In real life, the smaller one is MUCH smaller than the larger one.)

Monday, June 1, 2009

Loving These Much?

Look what I found when I was “browsing” for some good silk flowers…

Isn’t that GORGEOUS?!?!?

It combines all of my colors, and I love the whimsical look of the whole bouquet. What’s even better? It’s all silk, which means that it’s something that I could keep forever, if I wanted to. Plus, as a personal side note and nod to myself and MOH, these people in the floral business KNOW what color eggplant is! Unlike those fools that seem to abound in the linen business…

This bouquet is already made up and ready to order, with a kickin’ price tag! I think that I’m going to order one JUST so that I can see it in person. How awesome would it be if this was as gorgeous in person as it is online? I would literally die…in contentment!

And if that wasn’t enough, look what other options they had in their pre-made bouquets section:
Not “quite” right on the purples, but still beautiful!

LOVE this one. It brings in some other colors, that I wasn’t really thinking of using, but gorgeous!

And then low and behold, this online store might have become my new best friend. I found something that I didn’t even know existed. Lavendar. Lilies.

Check it out…

Aren’t they gorgeous?!?! Mr. CC has made ONE tiny request on the flowers – to include his personal favorite flower, which is the lily. He actually like the Stargazer lily the best, and I’m working hard to fit it into our black, cream and eggplant color scheme here, but I wonder if these beauties would do? They fit in a little nicer…

So if I place the order for any (or ALL!) of those bouquets just to check them out, I think that I’ll also order some of these lilies. They’re on close-out, being discontinued, and I could probably return them if I don’t end up liking them. But if I did like them…WOW!

Have you ever been searching for something else and stumbled upon what could be a little goldmine for your wedding? I’m loving them!
(All images courtesy of http://www.afloral.com/)

Monday, May 25, 2009

An Unexpected Surprise!

Here’s something else that I managed to find for a song the other day while out shopping with MOH…I told you it was a productive trip, right?!?


These, in case you don’t know, are shepherd’s hooks. I’m planning on using them to “line” the aisle at the ceremony site. I’ve seen these used at outdoor weddings from some blogs that I follow. Check out my inspirations…

Source (1, 2, 3, 4, 5, 6)

Aren’t they cool? And since they’re so simple, I can really do a lot of things with them. You want to know why I’m SO excited about these? Ok, twist my arm and I’ll tell you!

Our ceremony site is outdoors. So there’s not a lot of planning going into the décor…since it’s a nicely wooden glen with a beautiful gazebo for the actual ceremony. I’m not having an aisle-runner…in my mind I picture the aisle formed by the two sets of chairs set out…with strewn rose petals edging the actual aisle. Little CC will spread some additional petals on her walk, but mostly they’ll just be on the sides, something like this.

Source (1)


Although I’m thrilled with that look, I can’t help but listen to the voice in my head urging me to do a “little” something more. So, I’ve been coveting shepherd’s hooks for the past few months. But when I did some online searches to price them out, I was shocked at the prices that people pay for them. I was expecting a couple of dollars a piece, and was floored to see that they can run up to $12 a piece! That’s NOT in Miss Cotton Candy’s budget…well, it could be…but it just seemed like a lot. And not knowing what I would want to hang from them…you can see how this could add up quickly, right?

Enter Maid “Britney” – she’s the one that just got married last fall. Yes, you’re reading that right. ALL of my Maids are actually Matrons…they’re all married! But it’s my wedding, and if I want to have married women for Bridesmaids, then that’s what I’ll have. So anyway, “Britney” (not her real name, just an idol!) and I were talking one day about my tissue paper flower pomanders, and I mentioned wanting to find shepherd’s hooks to line the aisle with, and I further expressed my frustrations with not being able to find them cheaply enough. “Britney” suggested that I look at JoAnn’s. I’m a HUGE JoAnn’s fan, and hadn’t even thought to check them out for something like this. She said she thought that she had seen hooks in there, but maybe just as a seasonal item during early spring/summer, and that they were reasonably priced, if her memory was right.

Well, I’ve been in JoAnn’s more times that I can count, and I’d never seen them. But I wasn’t looking for them specifically, so I thought that I would try again. Down in San Antonio, where MOH and I were shopping, they’ve opened a “new” JoAnn’s that could almost be called Super JoAnn’s because it’s SO large. We decided to stop by there and didn’t actually go into JoAnn’s looking for shepherd’s hooks, in fact I went in looking for some fabric and happened upon their seasonal aisle…lo and behold…what do you think that I found?

Yep, shepherd’s hooks, just like “Britney” told me. And for the stellar price of only $3.99 a piece. I was sold! MOH was happy for me, and then confused when I said that I wasn’t going to buy any…I explained that I had a coupon on my desk at work that would get me an even better price and that I’d go to the local store in Austin and pick them up at some point next week. I wish that I’d had a camera for the look that crossed MOH’s face. Seriously, she looked confused, so I asked her what the deal was. But the joke was on me…she turned and pointed to a sign hanging over the display of shepherd’s hooks…

Oh yeah. Have I mentioned yet that I’m not the most observant of individuals? If it was a snake it would have BIT me! Either way – SCORE one for Miss CC’s team of thrifty shoppers! Half-price made them a whopping $1.99 a piece and I bought 10 of them right away.

Now, I just have to figure out what to do with them. Which inspiration picture do you like best? I can try to make some smaller tissue paper pomanders that would tie in nicely with the larger ones that will be hanging in the gazebo…or I could try to do some simple cut flowers in hanging jars…or I've found several DIY projects using artificial flowers...

Or do you have a completely different idea for me? Let me know!

Tuesday, May 12, 2009

The Checklist Looms...

I wrote about how special my Mother’s Day was. And it was special. But I wasn’t actually able to lay around all day and do nothing. It was nice for about half of the day, but that got old for someone as active as I can be…

So what else could be better than finishing a BIG wedding project?

What project is that you ask?

My tissue paper pomanders.

Yep, Mama CC, you read that right. All 6 pomanders are DONE! They are covered and hanging in the garage, which was kinda hard to do. The larger pomanders turned out quite a bit bigger than I had pictured in my mind. That’s completely fine that it worked out that way, as I was kind of worried about how small the pomanders might be when hanging from the large gazebo. So while I was happy that they turned out a little bigger than I had thought they would be, finding space in the house to hang them was a problem that I hadn’t really thought of ahead of time. I knew that making them early, I would have to store them somewhere, but didn’t really think about how hard it might be to store them.

I mean, they can’t just hang anywhere. They have to hang completely off of a wall, or from touching anything else, since laying against anything will squash the flowers. I think that they can be fluffed out once I’m ready for that, but we’ll see. And since the hanging situation made it impossible to hang inside the house, the only choice that I had was to put them in the garage.

Yes, Mr. CC, another thing has to go into the garage…this is our own private joke as the garage is already half full of stuff from when little CC and I moved in…I’m going to clean it out, I swear. But it might have to wait until after the wedding. It’ll be cooler then anyway…

So, hanging them in the garage meant protecting them not only from getting squashed, but also from getting dusty and dirty. Enter the big trash bags. Each tissue paper pomander is lovingly covered with a trash bag. We took the trash bag and opened it all up and poked a small hole in the bottom of the bag. We threaded the hanging ribbons through that hole and pulled the pomander up into the trash bag. A cheap trick, many thanks to Mr. CC’s quick thinking to our dust problem. So there they are, hanging in the garage, just patiently awaiting to be taken out, fluffed up and hung at our ceremony site in October. So…YEA ME! A day spent doing only what I wanted to do, watching the TV shows that I wanted to watch (go Bridezillas!) and finishing a project that has been looming over my head.

It feels good to have that one done! I am VERY glad that I listened to the advice that other brides that did that project had to give and started early on those pomanders. They are worth the work, and look gorgeous! All that needs to be done is to attach the black ribbons for hanging, so tissue paper pomanders…check!

That’s a big relief off of me to have that project finished.

So what’s up next? I need to call my hotel of choice and try to go ahead and get that block of rooms done…there are people that want to go ahead and make their reservations, and are waiting on me. Wish me luck!

Wednesday, April 22, 2009

Asking the Looming Question...

So, I’m going to post about a subject that I know at least ONE person will probably hate me for, but here it is.

The question of the day is this: IF I did change my tablecloth color (Gasp!) what could I do to bring the color of eggplant back into my reception venue?

Yeah, I know MOH, I know. It’s almost sacrilegious typing the question…but it’s out there anyway.

I’ve come up with a few options, but maybe you will be able to help me think up something else…since I SO do NOT want to choose this option, that might have the teensiest little bitsiest part of why I’m having decorator’s block when I think about this option…

The first thing that I thought of was to incorporate eggplant napkins, elegantly draped or folded to take up a good portion of the table top. Not my favorite option, but an option that would bring eggplant back to life at the venue. The main concern? If I’m having this much trouble finding eggplant tablecloths, will I run into the same dilemma with napkins? Possibly. But it’s also possible to me that I could make 200 napkins out of that elegant eggplant satin that I found in Dallas on my last trip up there…and with my serging machine and the right shade of thread, it would be a simple matter for the most part. Of course, they might be simple to find and buy, I haven’t looked into the cost of doing that yet…but it’s an option. Also along those lines is maybe finding or making eggplant table runners…or those draping cloths that cover the tops of the tables, but don’t go all the way to the floor. Something like the picture above. My problem with this option? Once again, finding the right color in a full tablecloth is hard enough…yada yada yada, you get the point. And I’m not sure that I like the look of table runners. It seems to me that the table might get a little busy with runners, napkins, plates and glasses. Not to mention the centerpieces and anything additional that I put on the tables to jazz them up…so I’m not sold on this option.

The only other thing that I’ve thought of is incorporating my beloved eggplant color into the flowers. One of my Maids got married just last September and had some LOVELY centerpiece vase/candle holder combo thingys that Mr. CC and I liked and she has graciously offered us use of them before she sells them. So, when I first started planning this shindig I wasn’t sure about using flowers on the centerpieces, but now it looks like I will have vases for free…a good reason to now use flowers in the décor. So can I incorporate enough eggplant in the flowers to appease my whims and desires?

I don’t know. I honestly don’t.

And the whole reason for trying to bring in more color is because my photographer mentioned that her only complaint about shooting out at Texas Old Town, our fabulous venue, was that everything in sight was wood, which tends to cast a yellowish hue on everything. She photoshops it out, so that it’s not something that I have to actually deal with in my pictures, but I was hoping to bring in enough color to combat some of that for her. Plus, I think that it will look nice…

Other than those ideas, I’ve drawn a blank. Can you come up with anything else that I could do to bring in more color than just the black and cream theme that I’ve got going? Or maybe I should just leave it black and cream and go with that? I don’t know right now….I need HELP!!!