
That’s the way us DIY brides like things, right? Well, this project (or should I say THESE projects) were super easy and quick to knock out. I worked on them for a while, but that’s just because I started and finished one and then waited almost a month before I finished the second one.  What could I be talking about? Oh, just my garters...I hadn’t previously given a lot of thought to my garter. Honestly, the thought to make my own never even crossed my mind. But I was in JoAnn’s one day shopping for something else (who knows what it was?) and I came across this material that was just PERFECT to use for my wedding. What to use it for? I didn't really know, but I bought it anyway! Now...I just had to find something that I could make out of this beautiful stuff. I hadn’t really settled on anything when I ran across this post...and knew immediately what to do with my material.
Looking at the instructions, it all seemed super simple, and it was. The directions were well-written and easy to follow. In fact, the hardest part about all of it was finding the elastic thread! It didn’t come packaged the way that I had envisioned that it would, so I kept going right past it. Once all of my materials were gathered, I spent about an hour one weekend working on this project.
I won’t re-post the directions...you can find them here if you’d like.
Here’s the final result. Pretty, yes?
What could I be talking about? Oh, just my garters...I hadn’t previously given a lot of thought to my garter. Honestly, the thought to make my own never even crossed my mind. But I was in JoAnn’s one day shopping for something else (who knows what it was?) and I came across this material that was just PERFECT to use for my wedding. What to use it for? I didn't really know, but I bought it anyway! Now...I just had to find something that I could make out of this beautiful stuff. I hadn’t really settled on anything when I ran across this post...and knew immediately what to do with my material.Looking at the instructions, it all seemed super simple, and it was. The directions were well-written and easy to follow. In fact, the hardest part about all of it was finding the elastic thread! It didn’t come packaged the way that I had envisioned that it would, so I kept going right past it. Once all of my materials were gathered, I spent about an hour one weekend working on this project.
I won’t re-post the directions...you can find them here if you’d like.
Here’s the final result. Pretty, yes?
 Front
Front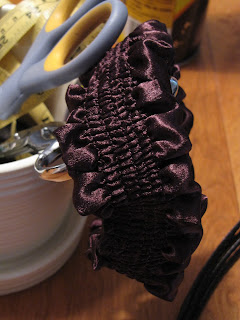 Back
BackOnce it was finished, I decided that I really needed to be a two-garter bride. One to keep and one to throw, right? I tried REALLY hard to talk B out of the whole bouquet toss and garter toss, but he’s not hearing any of it. He wants to do this, and since I’ve accepted the fact that I have a VERY involved and opinionated groom...and it IS his wedding too...I set about making one more garter. The plain satin garter was gorgeous, but I had in mind another how-to post I had seen on weddingbee a while back.
Knowing I had bookmarked it, it was just a matter of finding the dang thing...all of you other brides out there can sympathize...I’ve bookmarked a LOT of things! Once found, I set about collecting my materials. I decided that although the tutorial talked about using a ribbon as the center of the garter, that I would use a narrow strip of my crepe-backed satin to tie the two garters together nicely. I found some lace at JoAnn’s that I liked, and picked up some narrow elastic, and I was set.
Like the other how-to, these directions were also simple to follow. I didn’t follow them word for word, since I wasn’t using ribbon as the center, but once adjustments were made for that small change, it was simple to finish. I used safety pins on the ends of my elastic to “thread” the elastic through my satin “ribbon” and then started pulling it through. I had to make several attempts to get the elastic bunched just right and the right length to go around my thigh. Once I finished that part, sewing the ends up was easy.
 Here’s the finished product. You can tell the difference between the elastic thread (which doesn’t bunch) and the elastic band (that does bunch, huh?). I actually pulled the elastic out once and re-threaded it hoping to make it less bunched, but it didn’t really work out. So I left it. Once it’s on my leg, seen below, it’s not as bunched looking.
Here they are together, how I plan on wearing them.
 (Except I won’t be wearing them over pants, obviously!) B was sooo very helpful, telling me the entire time that I was taking these pictures that I wasn't supposed to wear pants underneath my dress! What do you think? I like that they match the eggplant color and love that one is kinda girly and one is more simple.
Here’s a cost breakdown for you:
Tossing Garter:
Material - $4.87
Elastic thread - $1.94
Thread - $1.72
Keepsake Garter:
Material - used from other piece
Lace - $2.91
Elastic - $1.72
Total together: $13.16
I’d say that’s a steal of a deal! And I love that I actually made this part of my bridal ensemble.
Are you planning on making part of your bridal look? Share the details with me!


thats great!! so is the eggplant your color???
ReplyDelete