Thursday, October 8, 2009

Shhh!!! It’s a Secret...

But I’m wore my wedding shoes today at work. Since we’re 16 days out from the wedding day, I figured that I’d better get my bootie in gear breaking in these shoes! And what better place to break shoes in than my office, which is all carpeted? None that I can think of for a clutz like me. There’s no guarantee that I won’t scuff them or something, but the chances are hopefully less likely on all carpet.

And maybe it’s just a little bit of kismet that the Chucks came in right before lunch? Here’s a shot of our shoes together...

Sorry for the yucky crackberry picture, but you take what you get. You can just barely tell that my shoes are purple...and I LOVE those hot pink polka-dots!

It gives me a little thrill knowing that the next time these two pairs of shoes are together like this it will be our wedding day!

Do you do this with new shoes too? Go through the “breaking in” process? I hope that it helps – so far they’re nice and comfy...

And yes, don't worry - I know and understand that you're upset that my "bridal brain" has been a little too logged down to remember to actually upload the pictures that I refer to in my posts (cough - can anyone say TWO days in a ROW? - cough). Don't fret - I put "Upload photos to blog" on the infamous To Do List...surely that means it will be done tonight, right? LOL!

To Do List, Nerves, and Excitement


Well, the clock is ticking, and deadlines for projects and due dates are looming. That’s right. We’re officially under 20 days now (16 to be exact!) and time is flying out the window...

I’ve been a busy little bee, with LOTS of help from my “helper bees” collecting those missing RSVPs. I needed to get a rough number that was more firm than an estimate in so that I can adjust rental contracts and such for chairs, linens, napkins and plates. Also, it helps me know how many programs and flower petal bags that I really need to make (or not make any more, as the case may be!).

I’m excited to say that most of my DIY projects are done. Things are wrapping up quickly and it’s highly unlikely that any “new” projects will be started, unless it’s something that I just can’t live without. (I can’t imagine what that would be at this moment!)

What have I been working on? Well, let’s see...

The Maids gifts are finished. Well, almost. The main gift is done and ready to go. There are some smaller gifts that will accompany their main gift, and I’m working on getting those wrapped up and completed this weekend.

The programs are in the process of being printed, cut and assembled. I got the eyelets that I needed at Michael’s last night, so once the printing and cutting is done, I’ll be ready to go. I’m still working a little bit on the design portion of the programs, but overall, the concept’s there.

We (B and I) are still trying to decide about assigned seating. But with all of your help (Thanks everyone who commented and left me with suggestions!) we managed to come up with a list of 16 table names that we like. Also, according to reader suggestions, we’re leaving them numbered as well...for ease of finding tables and such. Maybe I’ll work up a overall “map/layout” of some kind and leave it standing on the table where the mugs will be sitting.

B decided on the question of how to tie the knot...and we’re compromising a bit on it. He picked option A (find it here if you can’t remember) and then when we attach the separate tag giving a table name/number (if we do assigned seating) we’ll tie it like option C. Cute, huh? The table tags are designed and ready to print, stamp and emboss and cut. I’ll probably try to knock that out this weekend.

Our music list is almost finalized. We made a final pass through the rest of the DJ’s library of music, and are working now to finalize our Must Play and Play if Possible lists...along with gathering those special dance songs.

Rose petal bags are done. I thought that I would need 160 bags of petals to throw, but our actual number is looking to be closer to the 120-130 range. I “think” that I have 120 bags done. So I might make 10-20 extra just to be on the safe side, but I need to count and see how many I’ve gotten completed to be sure.

Cookies are rolled and frozen, ready to go. I am still working on having enough cookies for everyone...making 2 batches every other night. I’ll be finished with them by next week. But since our guest count is lower than expected, I only need three or four more batches to be done! That WILL be done before the weekend starts, hopefully. Cross that project off!

I booked a new hairdresser yesterday. Thanks for all of your advice and support in making that hard decision to let go of the other one. She wrote me back one time and demanded half of the money that she was expecting to make that day...I didn’t respond. It sounds callous, I know, but we didn’t have a contract, she didn’t want a deposit when I offered, and she was a little wacky.

My passport arrived, and is already tucked safely inside my honeymoon suitcase, along with our other papers/itinerary for the trip. Now, we’re just waiting on B’s to get here. But at least I get to go...hee hee!

We did get to Men’s Warehouse and get T measured and his suit rental reserved. I also got his shoe size and placed the order for the Boys’ Chucks...so gifts are a done deal and T will have a fancy, sch-mancy suit to wear and look all snazzy in. And to B’s delight, T’s rental DID include shoes, so he gets to suffer with the rest of them!

Wow. Sounds like I’ve been busy. There’s still plenty left to do, but we’re really getting to the end of things over here in our household. I’ve marked nearly everything off of the BIG To Do List...which is VERY exciting. And I can’t wait to see what changes this last weekend with no kids around will do for our task list.

In fact, someone asked us the other day at lunch if we were nervous. We both looked at each other and grinned. Nervous? No. Excited? Definitely! There are moments or two of stress, and I’m sure that there will be more coming up in the next 17 days, but for now, we’re moving right along. Coasting closer to our wedding day with every passing day, getting more and more excited about that fact!

In fact, I'm really excited about getting this corner back of my house... And this corner would be nice to regain control of too... How were you feeling less than three weeks out? Excited? Scared? Nervous? Stressed? I’m SO glad that I’ve worked, worked and worked all along up to now for my massive DIY list of projects...I’d be going nuts about now if I hadn’t!

Wednesday, October 7, 2009

Frustrations with Contracts...

I’m slightly retarded. Seriously...this bride thing is getting to my memory capabilities. Because I’m not THAT old to be this forgetful!

I’ve been waiting and waiting, and impatiently waiting some more, for the 21 day mark to pass. Why, you ask? Because I finished up the Rehearsal Dinner invitations a week ago and wanted to wait to mail them out until after it was all official with the hall being booked. And somewhere in my pea-sized brain, I had it stuck in my head that I could reserve the hall 21 days before the wedding.

So like a good little bride, I sent off an email first thing Monday morning when I got to work to Danny, the coordinator at Texas Old Town. Politely thanked him for all of his help thus far, and could I please reserve the hall for my rehearsal.

Imagine my surprise when a message came into my inbox two hours later telling me that he was more than happy to let me know that the hall was still available, but that I was not able to reserve it until Monday, October 19th...five days before the event PER MY CONTRACT! I was immediately outrged. What?!?! No, no, no. MY contract states that I can reserve it 21 days out, HE must be mistaken.

Lucky for me, I thought to check my actual contract before hitting the Reply button. Yep. Right there in black and white. “...parties may reserve the facilities for day before activities no more than five (5) days before scheduled event...”. Hmmm, well "don’t that just beat all?" as we say in Texas.

I sheepishly replied back to his email and apologized for my scatter-brained-ness (is that a word?) and told him that I would contact him on the 19th. He was nice enough to write me back and let me know that the hall is still unreserved at this point, and it’s highly unlikely that it will be booked, but that it has happened before.

Why would he tell me that? Doesn’t he know that I already have nightmares about that very thing happening? Without him confirming that it’s happened before. Wait. Relax. Calm down. Deep breath in. Deep breath out.

Much better.

Anyway, I felt a little silly, but what’s a girl to do? I mailed the invitations to the rehearsal dinner yesterday, so they’ll be arriving in mail boxes soon and I can do a reveal for you all...they’re beautiful. Here’s a sneak peek... CRAP! I forgot to upload the photo that I took...Doh! Thanks ColorCoated for pointing it out...you'll have to check back tomorrow morning to see it - Sorry!

Oh, and my Maids? Yeah, I ran out of postcard stamps for the RSVPs guys...and didn’t really want to go and buy three more $.20 stamps...so you guys can just email me what your votes on the food are, if you don’t mind. Sorry! Love you bunches!

Did you have dilemmas or drama getting your venue booked for a rehearsal, or was the rehearsal time included and guaranteed?

Tuesday, October 6, 2009

E-Session - Kathy and Randy


Hello there! I'd like for everyone to check out this SUPER cute E-Session shot by Pink Posh Photography right here in Austin...you're in for a treat! Listen to what Pink Posh had to say about this session:

"Kathy has had her session booked since forever it seems like...and with some last minute date shuffling, we were finally able to confirm a session date for her and Randy! I had them meet up at my house since I wanted to take them to some of my favorite spots in Austin (and no, it's not back at Hey Cupcake..but I was tempted just a smidge.). But Kathy had left it up to me to choose the spots, locations...and just do what I want - which may or may not be the best idea. I'm sure Kathy's bridal consultant is going to faint when she sees all the dust/sand on Kathy's dress...but better than grass and dirt stains right? :) Plus, dust shakes right out. :)
Stalkers, I would like for you to meet the lovely Kathy, Randy and my baby blue Paul Frank cruiser. :)"

I don't think that I'd want to be that bride facing the bridal consultant, would you? LOL! But I think that it was worth it...check out these adorable pictures...
As always, these were just my favorites from this session. Be sure and hop on over to Pink Posh's blog to see the rest! Thanks for stopping in and have a great evening!

RSVPs...The Initial Counts

So...our deadline for our RSVPs passed the other day. And then I waited a few days for those guests who might have mailed their invitations on the day of the deadline, or even a day after the deadline passed. And this is what we’re left with:

105 guests replied
93 guests did NOT reply

And that number that represents those that have not replied? It actually has 1 bridal party member and a butt-ton of family members in it. Not to mention people that we work (or used to work) with on a daily basis. What is with people?!?

I ask that question as someone who has been that person that didn’t RSVP before. Hell, I’ve even shown up at a party that I was supposed to RSVP for and didn’t! Yeah, I’ve committed all of the Emily Post no-no’s and I live to tell about it. I wouldn’t recommend doing things that I’ve been known to do in the past, but I will vow in the future to do a better job from here on out. Seriously. Now I know why that RSVP is so important to the person planning the party. I get it. Loud and clear. The message was sent, and received with no interruptions in service.

So now what?

Now I’ve got a list of people that we need to track down and get an answer from. Lucky for me, I was smart and I built in some “track down” time in our timeline since I knew that this would happen. The final head count isn’t due to our caterer and our baker until next week for changes to the food menu choices. And did you notice that I said “WE” would be tracking these people down? Yep. I did.

I’m going to rely heavily on B and our moms to help us track down the people that haven’t replied just yet. I think that between the four of us, it will just mean each of us having to contact a few people, but of course, I’ll just have my mom track down her family that hasn’t responded...and FMIL will track down only her family that hasn’t responded yet. B can take our friends outside of work, and I’ll take the people that we work with. Hopefully, between the 4 of us, we can get this done within a few days.

Then I can turn in final counts to our caterer. And adjust the number of cakes ordered, if needed. I can also adjust the rental items in number...and begin on the seating chart. See how important this little RSVP is?!?! I really had no idea...just didn’t get it before now.

How did you tackle tracking down the people who didn’t respond? Any words of advice for me on how to word things? I’d love to hear from you!

Monday, October 5, 2009

Fun Times with Word Text Boxes!

So I’ve had a request from a reader to give a little more detail on how I made my invitations. Since I think that the request is geared more towards the design process than the part where I lined up the papers, mounted them and put it all together was more straight-forward, I’ll start with some tips and steps that I used to actually design the invites.

First and foremost, you need to know the size that you want to end up with. For me, this meant that I needed to figure out the size of the pocketfold first. Once I had that, then I would have a starting point for my invites. You should also consider the size of envelope that you want to work with, as that could be a factor as well. If you want to use an odd-size envelope (like square) then you might start there.

So, I’ll walk you through my process...

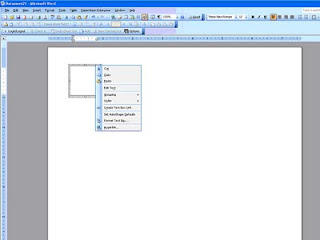
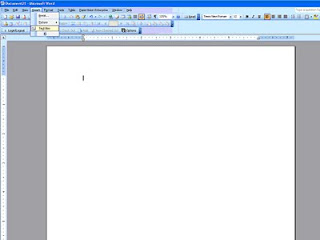
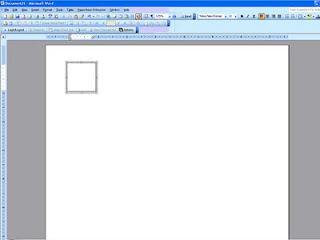
Once you have a starting size, open a new document in Word. Then at the top of the screen, select Insert. From that drop-down, select Text Box. This will add a text box on the screen (you may have to click once or twice to get it placed on the screen). It will have a border, and probably be small in size, but those are things that you can change so don’t worry about it. If you play with your mouse/cursor a little you’ll notice that the cursor changes shapes...when not on the text box it’s a normal arrow...when altering the WHOLE text box, it becomes a cross with arrows. This is important, because to make changes to the box, you have to place the cursor to where it changes to the cross with arrows and click to activate the whole text box. When the whole text box is selected, some dots and circles appear on the border of the box, instead of just lines to make the border.
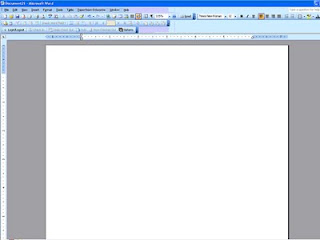
Once the whole text box is selected, you can right click your mouse and a list of options appears.Select Format Text Box. This will open up a new box on your screen. (If you didn’t select the whole text box, then that selection will not appear from the menu. Go back and try to re-select the whole text box and try again.) There are several tabs across the top. The two that I mainly deal with are Size and then Colors and Lines.
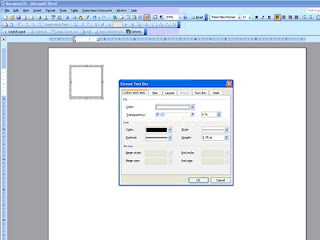
First, let’s make the text box the right size. Click on the tab Size and input the height and width that you desire. For instance, if I’m making a 5”x7” invitation, I would put in 5” in the width and 7” in the height box. Now, if I was making a 5”x7” invitation that would be mounted on cardstock or some other paper, I would go a little smaller, like 4.75”x6.75” in order to make the matte a true 5”x7” and the invitation centered upon it. Does that make sense? You can enter in any size you want, you don’t have to use the up and down arrows that you see to the side of the size boxes. Once you get your size entered, click on “OK.”
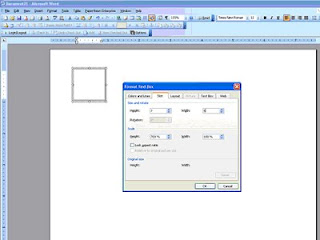
Your text box immediately changes size to what you specified. Sometimes I get confused on which direction I want the box to run on the paper and I mix up my width measurement with my height measurement. No big deal. Right click the box again and go through the process just swap the measurements. Click OK and your box will re-orient.
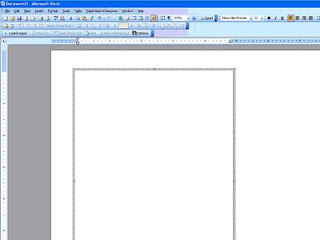
Next, I would drag the text box to where I wanted it to print on the paper. This part was important to me, as I tried to get as much out of each sheet of paper as I could, so the layout of the boxes was muy importante. I would make all the text boxes for everything and then play with dragging and dropping to see what would fit together. Tip: If something doesn’t fit one direction, change the page layout to Landscape and try the boxes that way. If you go up to file and try to select Page Setup and find that it’s “greyed out” then you need to go back to your document and click OUTSIDE of the text box and then go back and try again. I ran into this time and time again...so hopefully that little tip will save you some headaches.
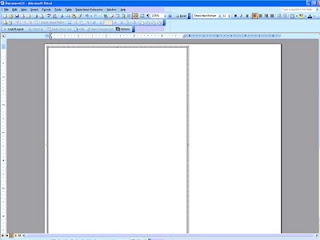
If that still doesn’t work, think about changing the direction that your text box itself lays. Lay it side-to-side instead of up-and-down, because text will print in any direction.

To move your text boxes to the edges of the paper and have it print successfully, you will also need to change the margins on your paper. Caution: Word does not like 0 margins...I learned that the hard way. You should usually leave .3” on all sides...Word stays happier that way. I take all my margins down to .3” just to maximize my paper, but that’s just my preference.

Once your text box is where you want it, it’s very simple to insert the text. Move your mouse/cursor inside the box and click. You’ll see a blinking cursor appear inside the text box and you’re ready to type away. Just like any document, you can fiddle with the alignment (left, right, center) and use any font and size that you want. Like I mentioned earlier, you can also have your text print in any direction. There’s a Text Direction option under Format at the top of your screen. Just be sure that you’ve clicked inside the text box that you want to change, and then select how you want your text to print.
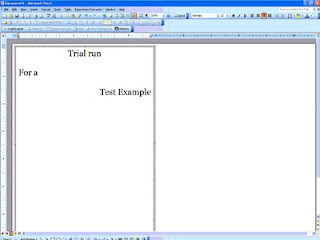
Just be careful about staying within your border. If it doesn’t show in the text box, it’s not going to print on the paper either! You can mix alignments, font and font sizes until you’re satisfied with your final product. You cannot mix text directions within ONE single text box. But you CAN lay text boxes up against each other (or even slightly on top of each other) if you wanted some words to print one way and others to print a different direction. Just practice with it and you’ll figure out how you like it.
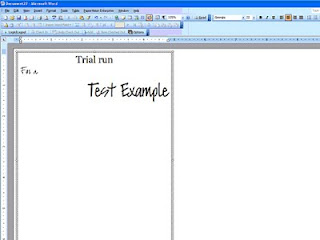
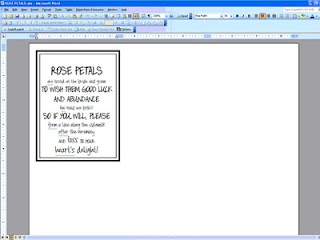
Once you’re happy with what’s inside your text box, I would change the border. For my own taste, I’m cutting most things out and choose not to have a printed border. But, borders can be fun and a neat and tidy way to close your text box. Remember my petal bags? I used two text boxes to get those two borders, and it worked great for that project. But for my invitations, I was cutting them all out, so I didn’t want lines. But I did want some cutting guidelines...
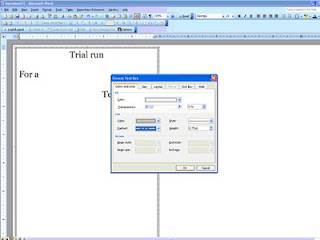
To get cutting guidelines, I just right clicked the whole text box (cross with arrows) and selected Format Text Box. Using the tab titled Colors and Lines, you’ll find two important features. The Fill feature and the Line feature of your box. Let’s talk Line first.
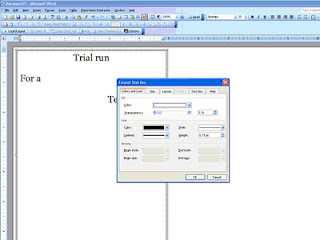
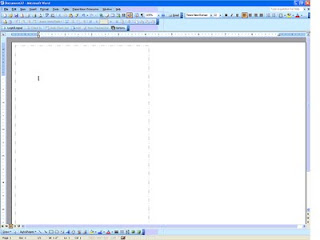
You can change the color of your Line/Border to anything that Word can create. You can also change the style of the line, making it whole, dotted or dashed and several combinations of the three. And last, but not least, you can change the thickness. For cutting guidelines, I selected a light grey color, a dashed line and a thickness of just .75. That made faint lines that I could barely see (in some instances) to use to guide my cut. See? You can barely see them...and I had to make those at 1.25 in thickness just so they would show up here. But they weren’t dark enough to still show badly if I didn’t cut exactly perfect either.
Play around with it and see what you prefer. You have to click OK to see the changes in the border, just like seeing the changes in sizing earlier.

The other thing that I mentioned that you can find on the Colors and Lines tab was the transparency of your text box, or Fill. There is a sliding adjustment bar in this box that allows you to make your text box non-transparent, semi-transparent or transparent and all degrees in between those options. Just slide it around and play with it...I personally prefer all of my text boxes to be transparent (slide all the way to the right), but once again that’s my preference only.

If you’re using two text boxes to achieve a double boxed look (like petal bags) then the text box on the outside will need to either be made transparent to show the inside box through it, or you can play with the order of the boxes, bringing one forward or sending one backward to achieve the same goal. I think that it’s easiest to make one transparent, so that’s why I told you that way. But just know that there are other options to achieve the same goal.

The last thing that you’re going to want to do is a test print. You always, always, always want to do a test print. I cannot stress this step enough! Every printer is unique and different, and reacts differently to different types of paper and margin settings. Just because the text box shows to be fully on the piece of paper on the screen with the entire text showing does NOT mean that it will print that way. Many times, I would do my test print to see the bottom ¼ inch of the text box missing. Usually simple to fix, just drop and drag the text box up one or two clicks. Other times, you may have to get more creative than that...

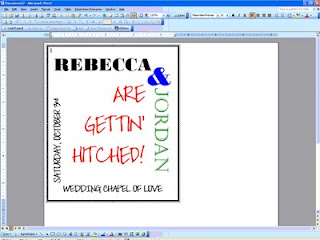
So that’s it in a nutshell. You can also do most of this in Power Point, I believe. I’m not as familiar with Power Point, which is why I chose Word. But after the first trial run project created this way, I had really learned the ropes and ALL of my paper products were designed in Word by moi. And the first trial run wasn’t hard by any means, but it was frustrating...my boxes kept moving and disappearing and I couldn’t find them again...but just keep at it and you’ll get the hang of it, I’m sure! Before long, you’ll be able to make something like that! Well hopefully, yours will be MUCH prettier, but I was trying to illustrate that a little practice will do wonders for your skill level.
Next up? We’ll talk about adding clip art or images into text boxes (think maps!) which requires a whole post to itself! I hope this helped answer some questions...if you have more specific questions, feel free to email me or comment below and I’ll get back with you one on one.

Sunday, October 4, 2009

E Session – Jennifer and David

Christina Carroll of Christina Carroll Photography brings us another E-session today...

"I met Jennifer & David at their house for their engagement session. They had searched and found a lot of great places for photos. We even went to David’s family’s farm to do some pictures. I was very excited about the cotton field. Jennifer & David are so cute together. They were smiling and laughing in every picture."
These pictures make me want to look for a farm with cool stuff on it...hope you enjoy!Once again, Christina captures a shadow of a tree in her picture...and the result is wonderful!
I couldn't resist that last picture...big tractor tires...a cowgirl inside one of them...and a cowboy hat! Perfection!
Hop on over to Christina's blog and check out the other images from this session...there's some really great ones!